Skill Level: Simple (basic turnout installation) to intermediate (adding relays and DCC control).
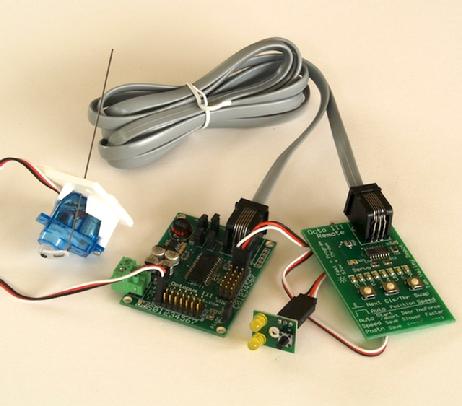
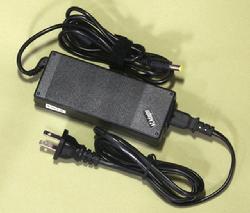
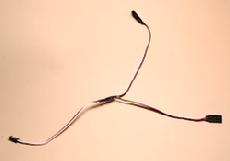
The Octopus turnout control system. Left to right - R/C servo in bracket, Octopus III, Fascia Controller, Remote Aligner connected to Octopus III with 7 foot cable.
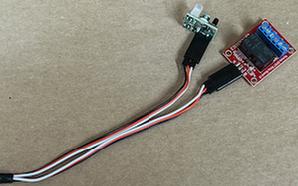
Octopus III Eight Servo Driver with Remote Aligner Tool
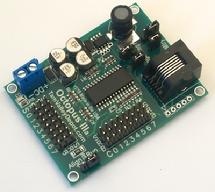
The Octopus III can drive up to 8 servos to move turnouts or other devices on your layout controlled by a toggle switch, a momentary pushbutton, the output of a signal system or a DCC decoder. There are 8 positions for plugging in R/C type servos and 8 inputs for switches or 5V logic.
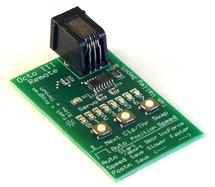
The Remote Aligner allows you to stand by the turnout being aligned so you can precisely align the servo endpoints with ease. No more hanging under the layout trying to push buttons. The servo endpoints are found automatically by searching for hard endpoints or you can manually align them with the Remote Aligner. This allows each servo to be adjusted to its optimum range and endpoints and each servo can be independently adjusted. With the Remote Aligner you can set the amount of force used in the automatic alignment to match your rail size and the servos you are using. The board also has jumpers for setting the range from +/-20 degrees around center to +/70 degrees and for centering the servo to simplify installation for applications where there are no hard endpoints or where you are using the same turnouts in all locations. The Octopus III has an on-board high-frequency switching 1.8A power supply that is more efficient than the old linear power supply. This means less heat and a lower power draw. Power input is any power supply from 7.0-24 volts DC.
You can use the same fascia controllers as the Quad. This gives you a simple way to hook up the inputs to the board using servo-style cords and extensions. You can use "Y" cords to use more than one fascia controller to control one servo. You can also use a "Y" to connect two servos to one output (works great for passing sidings!).
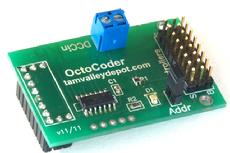
If you want DCC control of your servos you can add an Octocoder (see below) which gives you DCC Accessory control as well as a port for a fascia controller for local control.
Octopus III Board has 8 positions for driving servos between two positions and 8 inputs for fascia controllers (see below) or toggle switches. Octopus III uses the remote board (below) to align the servos and has automated endpoint adjustment as well as full manual control. Ideal for use with miniature servos and the servo mounting kit (available here). Power with 7.5-24V filtered DC (do not use AC and please do not use old "powerpacks" - they are not filtered). Octopus III has a built-in switching power supply for high efficiency and greater range. You should budget 1 Amp per board with 1 Amp overhead (for when the servos are driving to new positions). So 3 octos should have a 4 Amp power supply. Board is 2.5" x 1.9" in size.
Remote Aligner for Octopus III Used with the Octopus III (above) for alignment of servos (cannot be used with the Octopus II). Just one of these needed for all of your Octopus IIIs. Comes with a 7' cable which allows you to stand next to your turnout while aligning the servo - no more acrobatics and hanging upside down below the layout! The cable is a 6-pin straight data cable (not a phone type cable). Board is 2.7" x 1.7" in size.
OCT031 $15.00 USD
DCC Add-on for the Octopus II/III
By adding this DCC stationary/accessory decoder to the Octopus you can control your turnouts with servos and DCC at the lowest possible cost per turnout. No frills just throws the turnouts from your throttle or JMRI.
Octocoder - Stationary DCC decoder Add-on for Octopus II/III
You can control your Octopus II or III with the Octocoder, a simple stationary DCC decoder. The board provides connections os you can also connect fascia controllers and LEDs for local control. (Will not work with toggle switches however.) No CVs to program - just put on the address jumper and issue a turnout command from your throttle to set the address block. Uses 8 consecutive DCC addresses.
OCD001 $24.00 USD
12V 5A Power Supply for Accessory Bus Use
12V 5A 60W switching power supply. Best for powering the Octo III. This unit will power up to 4 Octo IIIs fully loaded with servos. Plug size is 5.5/2.1 mm. Power supply comes with a US 110V plug. By swapping the power cord can be used with 100-240V~50/60Hz power. If you don't want cut and strip the wire ends use the power jack to screw terminal adapter below.
DPS012 $16.95 USD
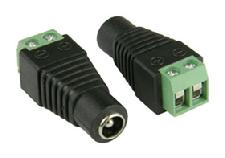
Power Jack to Screw Terminal Adapter
This adapter mates with the 12V power supplies to make them easy to hook up to wires using the screw terminals. Jack size is 5.5/2.1 mm. Plus and minus terminals are marked. Price is for one adapter - picture shows two to illustrate both ends.
JCK001 $1.50 USD
Note: color may vary by batch
Miniature Servo (SG90) Subminiature 9g servo. These have plenty of power for hinged point turnouts and solid rail point turnouts. If the point rails are hinged then the rail size is not an issue - it has been used up to G scale, otherwise code 100 is max for non-hinged points . Size 1.25" wide (including mounting tabs) x 0.5" deep x 1.125" tall. Servo lead about 7". The label on the servo and the lead colors may vary between batches. Works with all of our boards. Every servo is tested before shipping.
SRV002 $4.95USD
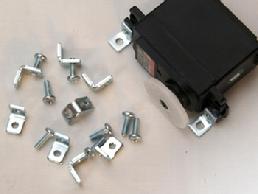
Servo is shown for illustration purposes. Kit includes 8 L-brackets and 8 screws
L-bracket Mounting Kit
An easy method to mount a servo under the layout. Also a nice way to mount servos for operating a semaphore blade. The kit works well for both miniature (SG90) and standard size servos. The kit includes (8) 3/8" L-brackets and (8) #4-40x1/4" screws for mounting four servos. To mount the bracket to the layout use the screws that come with the servo.
LBR001 $5.95 USD
12" (30cm) Servo Extension Cable (Set of 10)
3-wire servo extension cable 12" (30cm) long, 24 AWG stranded wire. Added to the 12" cord that comes with most standard size servos you can power a switch up to 2 feet from an Octopus or Quad Servo board. Set of 10 cables.
Can also be used for Fascia Controllers.
SRX112 $19.00 USD
(Set of 10)
40" (100cm) Servo Extension Cable (Set of 5)
24 AWG 3-wire servo extension cable. Set of five 40" extension cables.
How many of these can you daisy chain together? In an experiment I daisy-chained 15 extensions and found that the servo still worked OK. At 20 extensions, the servo threw but could not hold against back-pressure. So I would say up to 15 40cm extensions is the limit - that's 50 feet.
Can also be used for Fascia Controllers.
SRX540 $18.00 USD
(Set of 5)
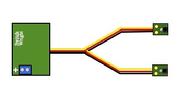
Y extension The Y extension can be used with the fascia controllers to provide two control points for one switch.
Y cables can be used to connect more than one fascia controller to a single input.
12" Y-cord The Y can can also be used with the fascia controllers to provide two control points for one switch (For Octo III the Mntry jumper must be on).
Y cables can also be used to attach two servos to one output. Both servos will move in the same manner at the same time. (Note: some users have had trouble getting this to work with some servo types).
A third use is to connect a DPDT relay and a fascia controller to the same control input (NOT a servo output) so that a relay and a fascia controller can be used at the same time.
SRX003 $3.75 USD
Remote Relay for Octopus Use a Y extension to add a DPDT relay and a fascia controller at the same time.
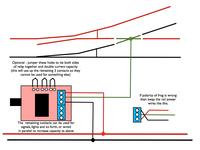
Frog Wiring Info. Click to Enlarge
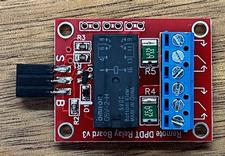
5 Volt 2 Amp DPDT Remote Relay Board w/Ycord Attaches to the Controller input of the OctoIII to add a DPDT relay to control accesories and frog power. Usually used with a fascia controller and the included Y cable. Can also be used with the DCC Octocoder. Contacts are rated for 2 Amps absolute maximum and have resettable fuses.
5VRD01 $17.95 USD
S - control line. Connect to white wire of extension cable. TTL logic levels. When the S line is low (0) the coil is off and draws no power. The white lines show the connections when the coil is not energized. When the S line is high (above 1.4 volts) the coil is energized and the center wiper moves to the other side.
R - 5 volt power supply. Connect to red wire. Relay will draw 0.1 Amps on the power line when energized. Relay is non-latching so will draw continuously when energized and will turn off if there is no 5V power.
B - Ground - connects to the black wire of the cable.
It is possible to parallel the contacts using three jumpers between the holes on the edge of the board to change the relay to a 4A SPDT. The white lines show how the jumpers should be connected.
Files for 3D-Printed Servo Mounts and Fascia Controller Mounts are
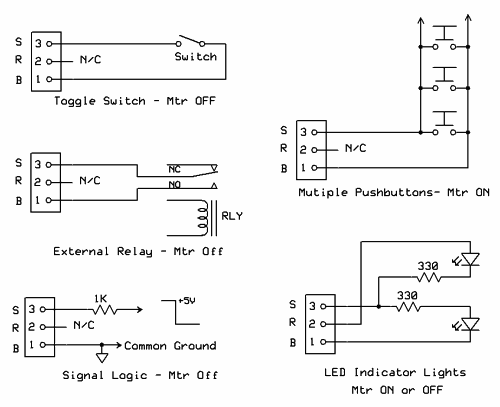
Roll Your Own Inputs The inputs to the Octopus are very versatile. You can use toggles or momentary switches. A jumper (MTR) is used to tell the Octopus whether you are using momentary or toggled inputs. When the Octopus is not sensing the input it puts out a signal on the same wire that can be used lighting LEDS to indicate turnout position. The wire used is a standard servo extension so you don't need to cut wires.
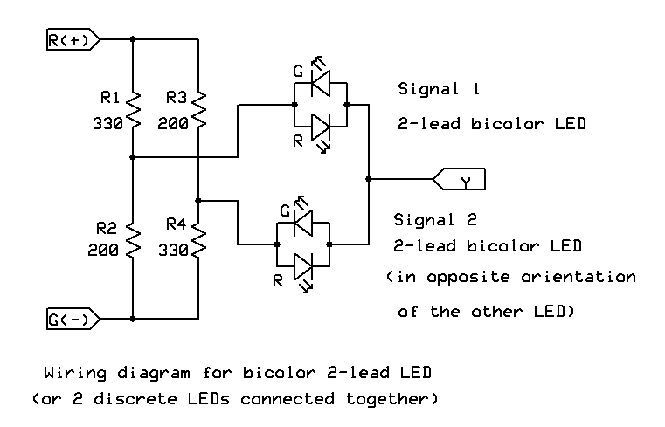
Use a 2-lead Bicolor LED The upper diagram shows how to wire 2-lead bi-color LEDs. Note that Y in this diagram is the same as S ion the Octo III board. The values for R1 and R2 are different to compensate for different apparent brightness of the red and green LED used by the customer. You may want to try both LEDs at 330 Ohms as newer LEDs are better balanced. Also, this diagram is for older, less efficient LEDs that require ca. 10 mA to appear bright. A lot of modern LEDs can use less current so the value for the resistors can be raised to 680-1K Ohms. if you want just one LED you can omit R3 and R4 and the lower LED.
How to use fascia controllers and toggle switches with the Octopus II.